澳大利亚
配置
模块名 |
模块密钥 |
描述 |
|---|---|---|
澳大利亚 - 会计 |
|
当会计 财务本地化 包设置为 澳大利亚 时默认安装。该模块还安装了 ABA 信用转账 和 汇款通知报告 模块。 |
澳大利亚报告 - 会计 |
|
包括 纳税支付年度报告(TPAR) 和 BAS 报告。 |
澳大利亚 - 薪资单 |
|
澳大利亚薪资单本地化。 |
Australia - Payroll with Accounting |
|
安装澳大利亚薪资单和会计之间的链接。该模块还安装:澳大利亚 - 会计;澳大利亚报告 - 会计;以及:guilabel: |
会计客户报表 |
|
允许管理和发送来自合作伙伴分类账和联系表的客户月度报表。也用于新西兰。 |
Employment Hero 澳大利亚薪资单 |
|
将 Employment Hero 中的所有工资流水与 Odoo 日记账条目同步。 |
会计科目表
澳大利亚会计科目表包含在**澳大利亚 - 会计**模块中。进入 访问。
参见
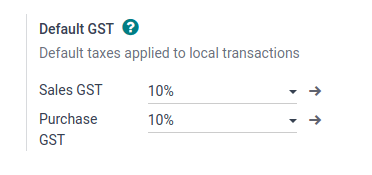
Taxes and GST
The default Australian taxes impact the BAS Report, which can be accessed through .
In Australia, the standard Goods and Services Tax (GST) rate is 10%, but different rates and exemptions exist for specific categories of goods and services.
税项映射
在澳大利亚本地化包中,税收名称将税率作为其命名惯例的一部分。
尽管 Odoo 的税收金额很高,但这些税收非常相似(主要为0% 和 10%),对以下方面有不同的税率格局变化:
货物
服务
应纳税额年度报告(TPAR)
没有澳大利亚商业登记号码的 TPAR
参见
Taxes including a TPAR mention impact not only the BAS report but also the TPAR report. Businesses from certain industries need to report payments made to subcontractors from relevant services during the financial year. Odoo combines the use of taxes and fiscal positions to report these payments on the TPAR report. Taxes with the mention TPAR without ABN are used to record amounts withheld from subcontractors without an ABN for the ATO.
参见
Here are the taxes for Australia in Odoo 17.
GST Name |
描述 |
GST Scope |
GST Type |
|---|---|---|---|
10% |
GST Purchases |
采购 |
|
10% INC |
GST Inclusive Purchases |
采购 |
|
10% C |
Capital Purchases |
采购 |
|
0% C |
Zero Rated Purch |
采购 |
|
100% T EX |
Purchase (Taxable Imports) - Tax Paid Separately |
采购 |
|
10% I |
Purchases for Input Taxed Sales |
采购 |
|
10% P |
Purchases for Private use or not deductible |
采购 |
|
100% EX |
GST Only on Imports |
采购 |
|
10% Adj |
Tax Adjustments (Purchases) |
采购 |
|
10% |
GST Sales |
销售 |
|
10% INC |
GST Inclusive Sales |
销售 |
|
0% EX |
Zero Rated (Export) Sales |
销售 |
|
0% EXEMPT |
Exempt Sales |
销售 |
|
0% I |
Input Taxed Sales |
销售 |
|
10% Adj |
Tax Adjustments (Sales) |
销售 |
|
10% TPAR |
GST Purchases |
服务 |
采购 |
10% TPAR NO ABN |
GST Purchases |
服务 |
采购 |
10% INC TPAR |
GST Inclusive Purchases |
服务 |
采购 |
10% INC TPAR N ABN |
GST Inclusive Purchases |
服务 |
采购 |
10% C TPAR |
Capital Purchases |
服务 |
采购 |
10% C TPAR N ABN |
Capital Purchases |
服务 |
采购 |
0% C TPAR |
Zero Rated Purch TPAR |
服务 |
采购 |
0% C TPAR N ABN |
Zero Rated Purch TPAR without ABN |
服务 |
采购 |
100% T EX TPAR |
Purchase (Taxable Imports) - Tax Paid Separately |
服务 |
采购 |
100% T EX TPAR N ABN |
Purchase (Taxable Imports) - Tax Paid Separately |
服务 |
采购 |
10% I TPAR |
Purchases for Input Taxed Sales |
服务 |
采购 |
100% I TPAR N ABN |
Purchases for Input Taxed Sales |
服务 |
采购 |
10% P TPAR |
Purchases for Private use or not deductible |
服务 |
采购 |
10% P TPAR N ABN |
Purchases for Private use or not deductible |
服务 |
采购 |
100% EX TPAR |
GST Only on Imports |
服务 |
采购 |
100% EX TPAR N ABN |
GST Only on Imports |
服务 |
采购 |
10% Adj TPAR |
Tax Adjustments (Purchases) |
服务 |
采购 |
10% Adj TPAR N ABN |
Tax Adjustments (Purchases) |
服务 |
采购 |
47% WH |
Tax Withheld for Partners without ABN |
服务 |
采购 |
BAS report
The Business Activity Statement (BAS) report is a critical tax reporting requirement for businesses registered for Goods and Services Tax (GST) in Australia. The BAS is used to report and remit various taxes to the Australian Taxation Office (ATO). With the Odoo BAS feature, businesses can report on the following:
Goods and Services Tax (GST)
PAYG tax withheld
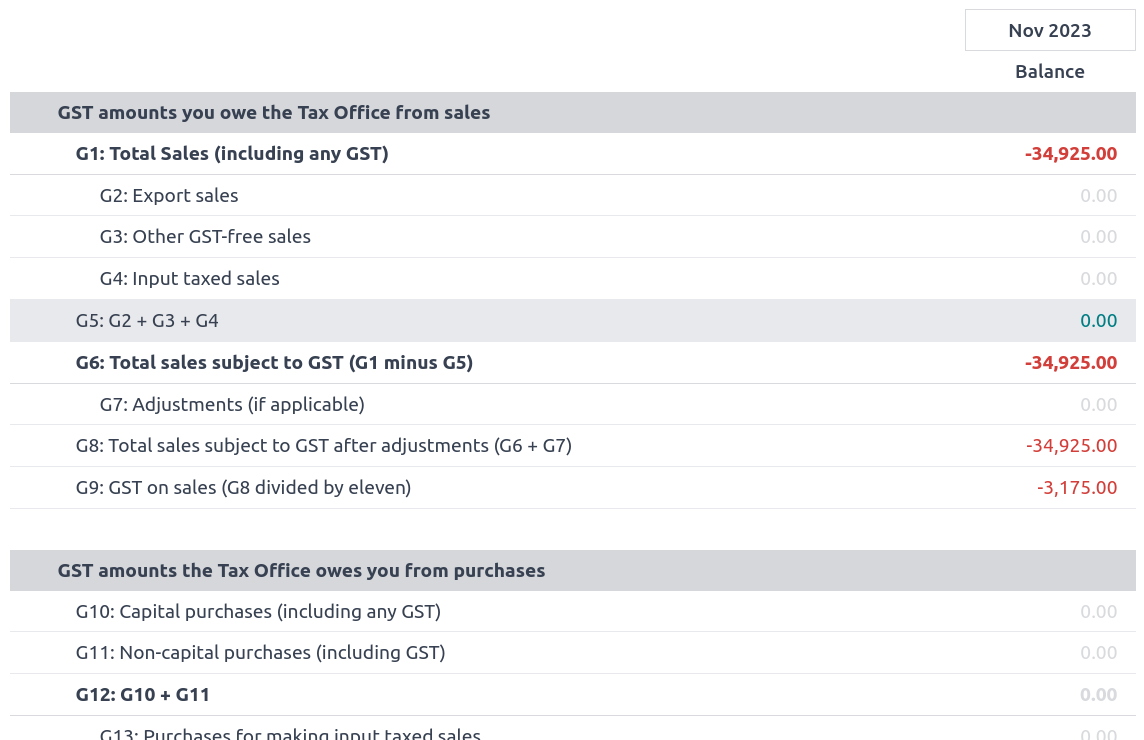
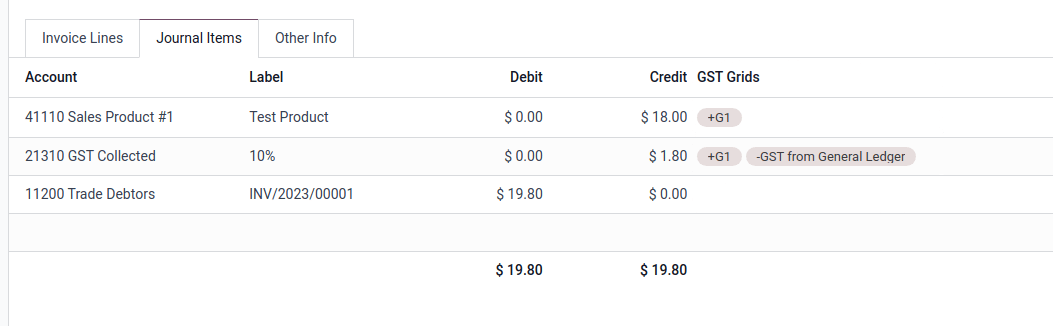
The taxes for GST are collected from the tax grid, which is pre-configured in the system. The tax grid can also be manually set up for any additional special GST. Once the tax for each account is set up, the system automatically slots journal items into the correct tax category. This ensures the BAS report is accurate and reflective of the business’s financial activities.
In addition, the BAS report includes the PAYG tax withheld components (W1 to W5, then summary, section 4). This integration ensures that all payroll-related withholding taxes are accurately captured and reflected within the report.
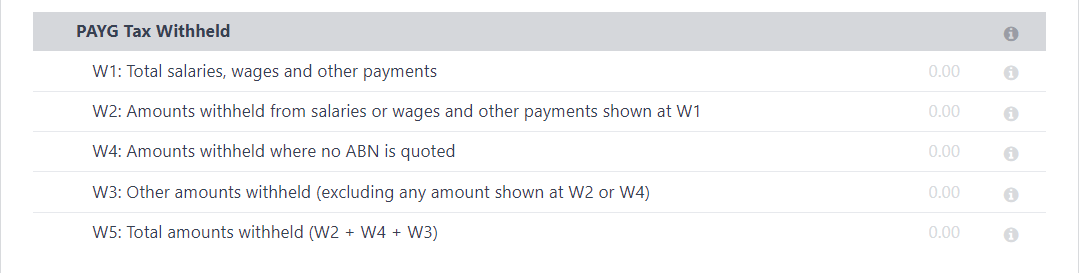
The module incorporates built-in rules that facilitate the automatic calculation of taxes for types W1 to W5. For a detailed walkthrough and more information on the calculation process for these taxes, please refer to the Payroll app documentation.
参见
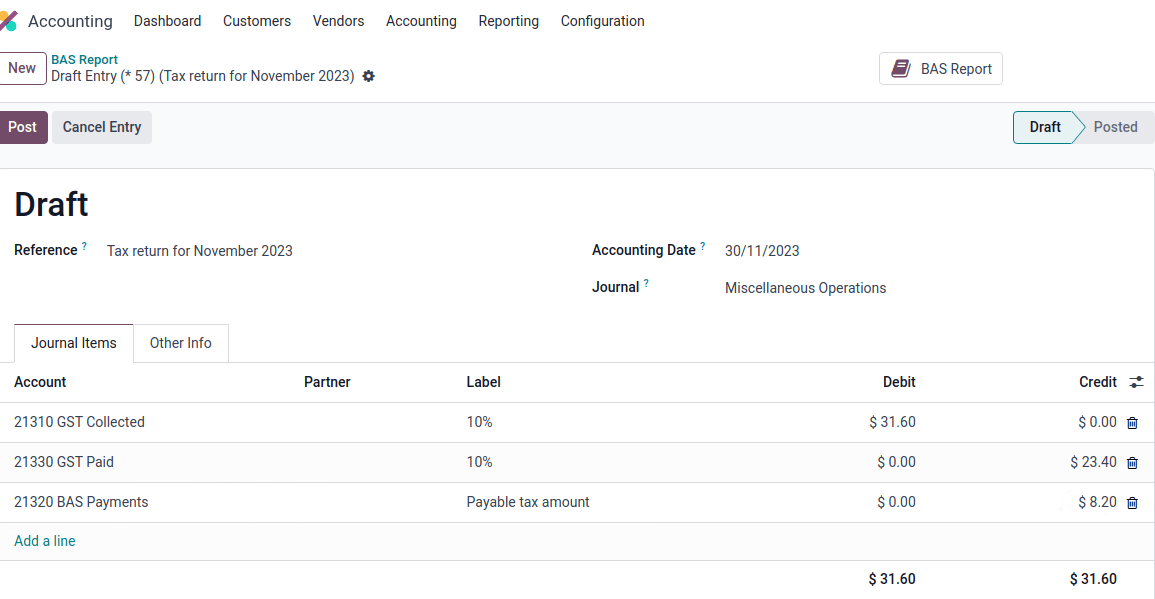
Closing the BAS report
When it is time to file the tax return with the ATO, click Closing entry. The tax return period can be configured in . Also, the start date of the tax return period can be defined through the period button (marked by a calendar icon 📅).
注解
Odoo 使用*日历季度*而不是澳大利亚财政年度季度,这意味着**7 月至 9 月在 Odoo 中是第三季度**。
在首次关闭条目之前,需要设置默认的 GST 应付账款账户 和 GST 应收账款账户。系统会弹出通知,将用户重定向到税组配置。
一旦设置了**应交消费税**和**应收消费税**账户,**BAS**报告就会自动生成准确的分录结账分录,使消费税余额与消费税结算账户相平衡。
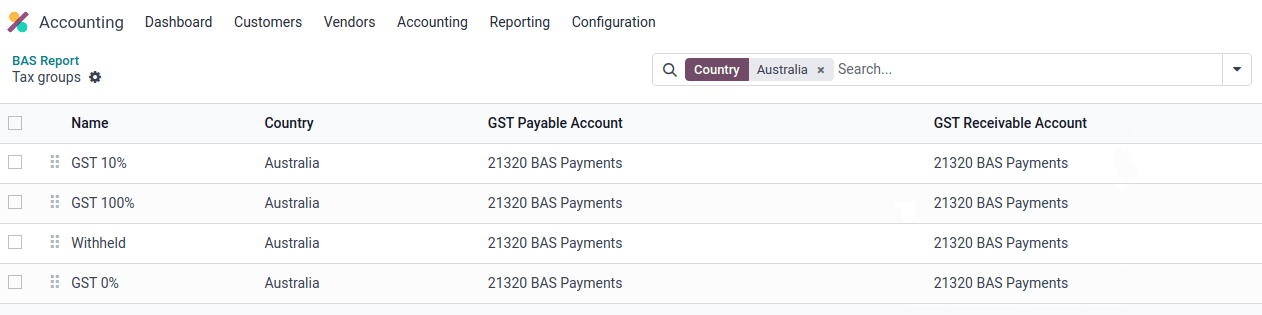
应收**商品及服务税**和应付**商品及服务税**之间的余额与税组定义的税款结算账户对账。支付给**ATO**或从**ATO**收到的金额可与银行对账单进行核对。
重要
The BAS report is not directly submitted to the ATO. Odoo helps you automatically compute the necessary values in each section, with the possibility to audit them to better understand the history behind these numbers. Businesses can copy these values and enter them on the ATO’s portal.
TPAR report
Odoo allows businesses to report payments made to contractors or subcontractors during the financial year. This is done by generating a TPAR. If you are unsure your business needs this report, refer to the documentation provided by the ATO. You can find this report in .
配置
Under or , select a your contractor and set a Fiscal Position under the Sales & Purchase tab.
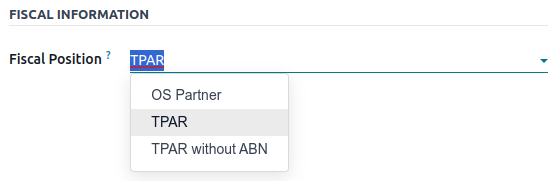
Upon billing a contact with a fiscal position set to TPAR or TPAR without ABN, the report is automatically generated in .
The report includes the ABN, Total GST, Gross Paid, and Tax Withheld from their TPAR subcontractors.
Total GST: the total tax paid
Gross Paid amounts: shows after registering a payment for those bills
Tax Withheld: shown if the subcontractor is registered with a fiscal position set to TPAR without ABN
The TPAR report can be exported to PDF, XLSX, and TPAR formats.
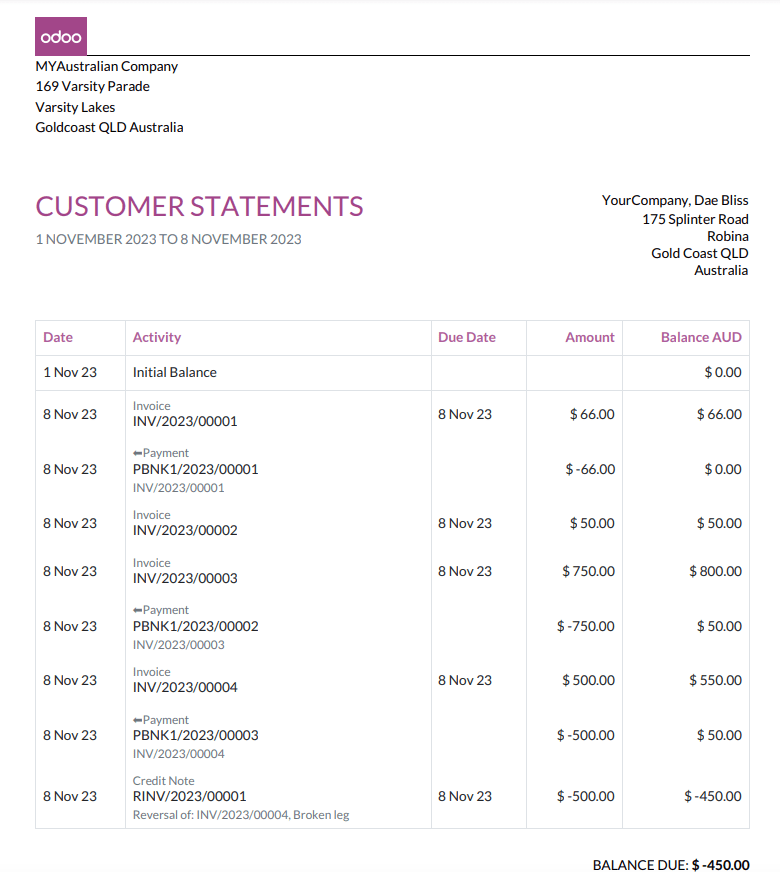
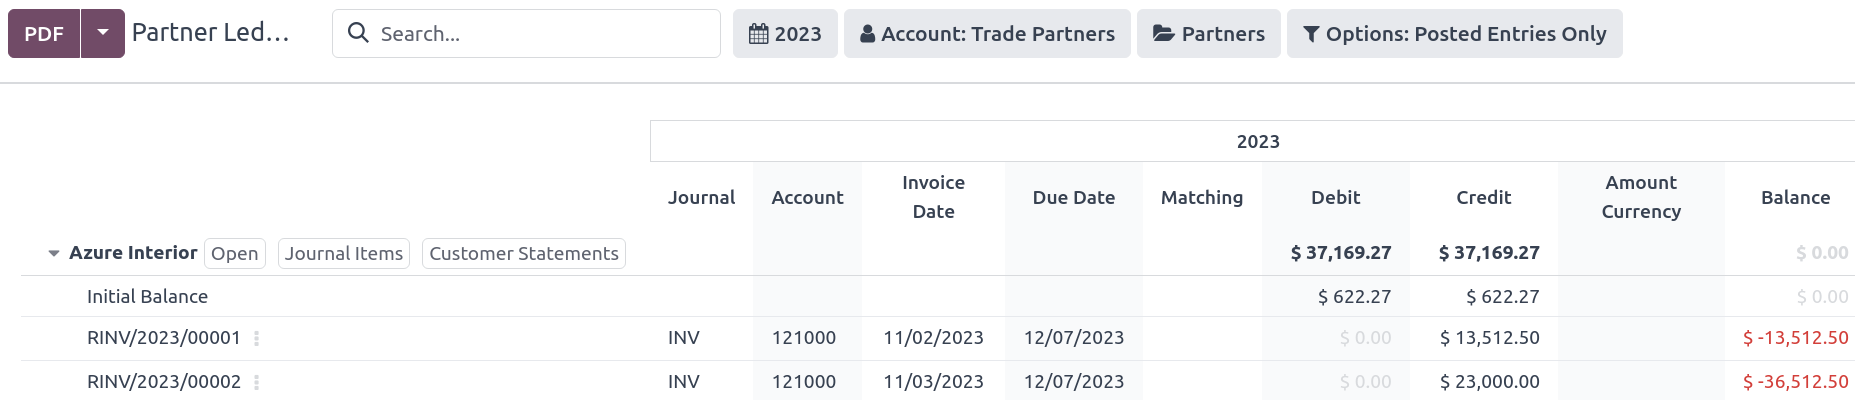
Customer statements
Customer statements allow customers to see their financial transactions with the company over a certain period, and overdue statement details. These statements can be sent out to customers by email.
There are two ways for customers to download these statements.
From the contact form: Customer statements are under . Select a customer, click the gear icon (⚙), and then Print Customer Statements. This prints out the statement from the beginning of the month to today’s date.
From the partner ledger: This option allows for more flexibility in selecting a statement’s start and end date. You can access it by going to . From here, specify a date range in the calendar menu (📅) for the statement, hover over a partner, and click the Customer Statements tab.
Remittance advice
A remittance advice is a document used as proof of payment to a business. In Odoo, it can be accessed by going to , selecting the payment(s), and clicking .

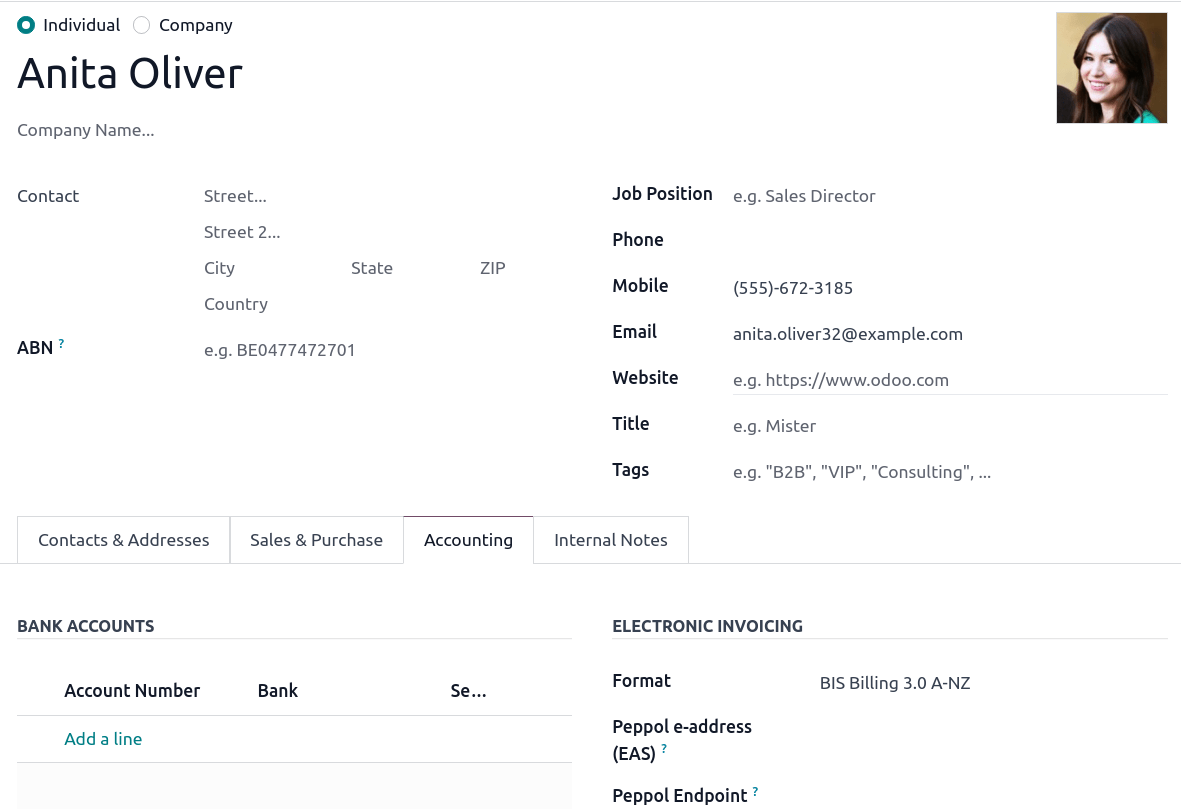
E-Invoicing via Peppol
Odoo is compliant with Australia’s and New Zealand’s PEPPOL requirements. You can find and set up electronic invoicing settings per partner under or , select a partner, and click the Accounting tab.
重要
Validating an invoice or credit note for a partner on the PEPPOL network will download a compliant XML file that can be manually uploaded to your PEPPOL network.
ABA files for batch payments
介绍
An ABA file is a digital format developed by the Australian Bankers’ Association. It is designed for business customers to facilitate bulk payment processing by uploading a single file from their business management software.
The main advantage of using ABA files is to improve payment and matching efficiency. This is achieved by consolidating numerous payments into one file for batch processing, which can be submitted to all Australian banks.
配置
设置
To enable batch payments, go to and enable Allow Batch Payments.
Bank journal
Then, go to and select the Bank journal type. In the Journal Entries tab, enter the Account Number and click Create and edit. In the pop-up window, fill in the following fields:
Bank
Account Holder Name
BSB
Account Holder
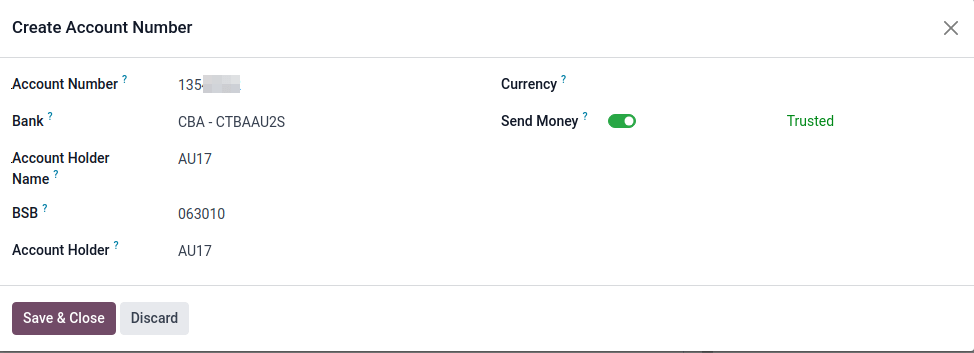
重要
The Send Money field must be enabled.
注解
The Currency field is optional.
Go back to the Journal Entries tab and fill in the following fields related to the ABA:
BSB: This field is auto-formatted from the bank account
Financial Institution Code: The official 3-letter abbreviation of the financial institution (e.g., WBC for Westpac)
Supplying User Name: 6-digit number provided by your bank. Contact or check your bank website if you need to know.
- Include Self-Balancing Transactions: Selecting this option adds an additional
“self-balancing” transaction to the end of the ABA file, which some financial institutions require when generating ABA files. Check with your bank to see if you need this option.
Then, go to the Outgoing Payments tab on the same Bank type journal. Click Add a line and select ABA Credit Transfer as the payment method.
Partners’ bank accounts
Go to or and select a partner for whom you want to add banking information. Once selected, click the Accounting tab, and under the Bank Accounts section, click Add a line to fill in:
Account Number of that partner
Bank
Account Holder Name
BSB
Accounter Holder
Send Money defines the bank account as trusted, which is essential for ABA files and must be enabled if to be used.
Generate an ABA file
To generate an ABA file, Create a vendor bill (manually or from a purchase order). Confirm the bill and ensure the vendor’s banking information is set up correctly before registering a payment..
Next, click Register Payment in the pop-up window: select the Bank journal, select ABA Credit Transfer as Payment Method, and select the right Recipient Bank Account.
Once payments are confirmed, they appear in . Tick the box of the payments to be included in the batch, then click Create Batch. Verify all information is correct and finally Validate. Once validated, the ABA file becomes available in the chatter on the right.
After uploading it to your bank’s portal, an ABA transaction line will appear in your bank feed at the following bank feed iteration. You will need to reconcile it against the batch payment made in Odoo.
Buy Now, Pay Later solutions
Buy Now, Pay Later solutions are popular payment methods for eShops in Australia. Some of these solutions are available via the Stripe and AsiaPay payment providers.
POS terminals for Australia
If you wish to have a direct connection between Odoo and your PoS terminal in Australia, you must have a Stripe terminal. Odoo supports the EFTPOS payment solution in Australia.
注解
You do not need a Stripe payment terminal to use Odoo as your main PoS system. The only drawback of not using Stripe is that cashiers must manually enter the final payment amount on the terminal.
工资
重要
Odoo is currently not compliant with STP Phase 2.
Create your employees
To create an employee form and fill in mandatory information, go to the Employees app and click Create. In the HR Settings tab, you can input the mandatory information:
TFN Status: if the employee provides a TFN, make sure to add it to the “TFN” field
Non-resident: if the employee is a foreign resident
Tax-free Threshold: if the employee is below or above the threshold
HELP / STSL: for all types of study and training support loans (e.g. HELP, VSL, SSL…)
Medicare levy Deduction
Medicare levy Exemption
Withholding for Extra Pay
…
Manage Australian contracts
Once the employee form has been created, ensure the contract is enabled by clicking the Contracts smart button or by going to .
注解
Only one contract can be active simultaneously per employee, but an employee can be assigned consecutive contracts during their employment.
Contractual information related to Australia can be found in the following three places:
Before assigning a salary amount, pay frequency, and other important details to a contract, defining the salary structure, start date, and work entry source is important. In Australia, a “Salary Structure” is employed to specify the tax schedule applicable to that contract, as defined by the Australian Taxation Office (ATO). Most contracts will fall under the following three structures:
Regular (Schedule 1): the great majority of Australian employees will fall in this category; hence, this structure is assigned by default to all contracts.
Working holiday makers (Schedule 15). When employing working holiday makers (WHMs), other taxes apply. For detailed information on these specific tax implications, refer to the documentation provided by the ATO.
No TFN. Choose this structure if the employee hasn’t provided a TFN for over 28 days.
重要
The structures Horticulture/Shearing (Schedule 2) and Artists and Performers (Schedule 3) are only partially complete, and proper tests should be performed before using them to pay employees in your production database. Send your feedback to au-feedback@mail.odoo.com.
The field Work Entry Source is also significant and defines how working hours and days are accounted for in the employee’s payslip.
guilabel:
工作时间表:根据员工的工作时间表自动生成工作条目,从合同的开始日期开始计算。例如,假设一个员工每周工作 38 小时,合同从 1 月 1 日开始。今天是 1 月 16 日,用户从 1 月 14 日到 20 日生成了一次支付流程。如果没有休假,薪资单上的工作小时数将自动计算为 38 小时(5 * 7.36小时)。Attendances: The default working schedule is ignored, and work entries are only generated after clocking in and out of the attendance app.
Planning: The default working schedule is ignored, and work entries are generated from planning shifts only.
重要
Additional configurations are necessary to ensure that Odoo’s payslips automatically compute various penalty rates as defined by an award (overtime rate, public holiday rate, etc). To create these configurations, create new work-entry types for each penalty rate and then assign a penalty rate in % to each. Once this one-time configuration is done, work entries can be manually imported for each period, and Odoo will separate the pay items and rates on the employee’s payslip.
重要
Timesheets do not impact work entries in Odoo.
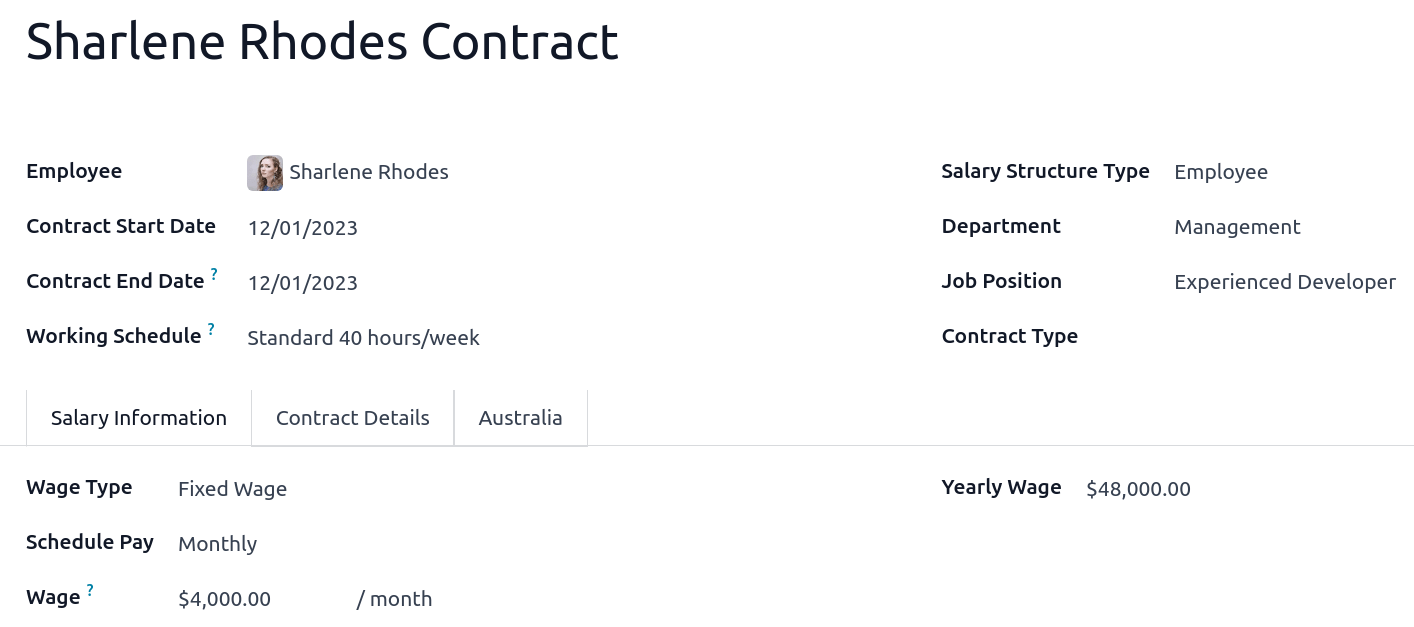
:guilabel:`薪资信息`选项卡包含一些对 Odoo 中支付流程频率和工资单规则管理产生重要影响的字段。
Wage Type: Select the Fixed Wage pay type for full-time and part-time employees. For casual workers and other Hourly Wage type. For employees being paid hourly, make sure to define the correct casual loading.
Schedule Pay: In Australia, only the following pay run frequencies are accepted: daily, weekly, bi-weekly (or fortnightly), monthly, and quarterly.
Wage (/period): Assign a wage to the contract according to their pay frequency. On payslips, the corresponding annual and hourly rates will be automatically computed.
注解
For hourly workers, please note that the hourly wage should exclude casual loading.
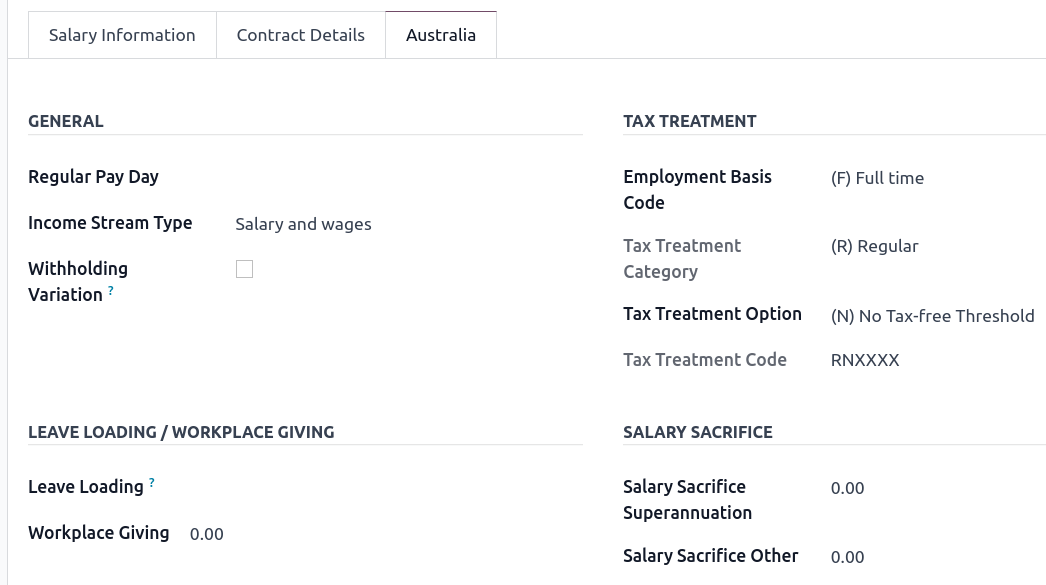
The Australia tab. Most of the fields in this tab are used for Single Touch Payroll (or STP) reporting, which requires a thorough understanding of several details from an employee’s contract. Review the information on this tab before moving forward with pay runs. This includes the following four fields which impact payslip computations:
Withholding Variation: use this field in case the employee’s withholding must be varied upward or downward according to their circumstances. E.g., if employee X benefits from a 25% withholding variation, their percentage of tax withheld will vary from whatever amount they were supposed to pay according to their salary structure and situation to a fixed 25%.
Leave Loading: if the employee benefits from a regular leave loading, the value set in the field Leave Loading Rate (e.g., 17.5%) is added to any amount earned when taking annual or long service leaves.
Salary Sacrifice Superannuation: any amount added to this field is deducted, per pay frequency, from the employee’s basic salary before the computation of the gross salary. Then, this amount is added to the super guarantee line of their payslip. E.g., if employee Y earns 5,000 AUD per month and sacrifices 300 AUD to superannuation, their gross salary will be 4,700 AUD, and 300 AUD will be added on top of their normal super contributions.
Salary Sacrifice Other: any amount added to this field is deducted, per pay frequency, from the employee’s basic salary before the computation of the gross salary.
Once all important information has been entered, ensure the transition of the contract’s status from “New” to “Running” to facilitate its use in pay runs.
Assign superannuation accounts
Upon receipt of superannuation details from a new employee, ensure the creation of a new account in to link it to the employee. Input the Super Fund, Member Since date, and TFN number of the employee.
Suppose the employee uses a superannuation fund that does not exist in the database yet. In that case Odoo creates a new one and centralises basic information about this fund, such as its ABN, address, type (APRA or SMSF), USI, and ESA. Super funds can be created or imported in .
重要
Odoo is currently not SuperStream-compliant.
Create pay runs with payslips
Odoo can create pay runs in two ways: via batch or via individual payslips.
Create a batch of payslips
When preparing to generate employees’ draft payslips (e.g., at the end of every week, fortnight, or month), navigate to and click New. Fill in the necessary info, click Generate Payslips, select the Salary Structure, Department, Employees, and Generate. This method allows the creation of multiple payslips corresponding to each employee in a single batch.
Give the batch a name. (E.g.,
2024 – Weekly W1)Choose the pay run’s start and end date. (E.g., 01/01/2024 to 07/01/2024)
Click on Generate. A pop-up window asks to confirm which employees should be included in the batch. By default, all active employees are included. You can leave Salary Structure field blank as Odoo automatically selects the structure linked to each employee’s contract.
The batch creates as many payslips as there are employees. There is no limit to the number of payslips created in a batch.
Verify important information on each payslip. After payslips from a batch have been generated, there is no need to manually compute payslip lines; Odoo does it for you.
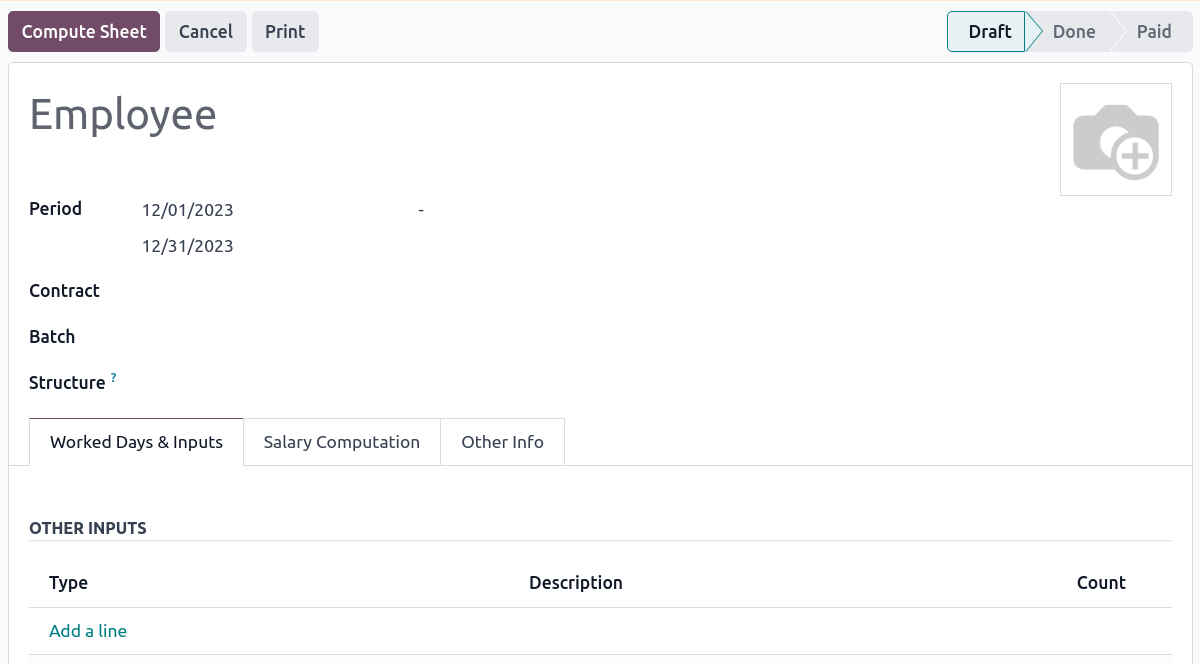
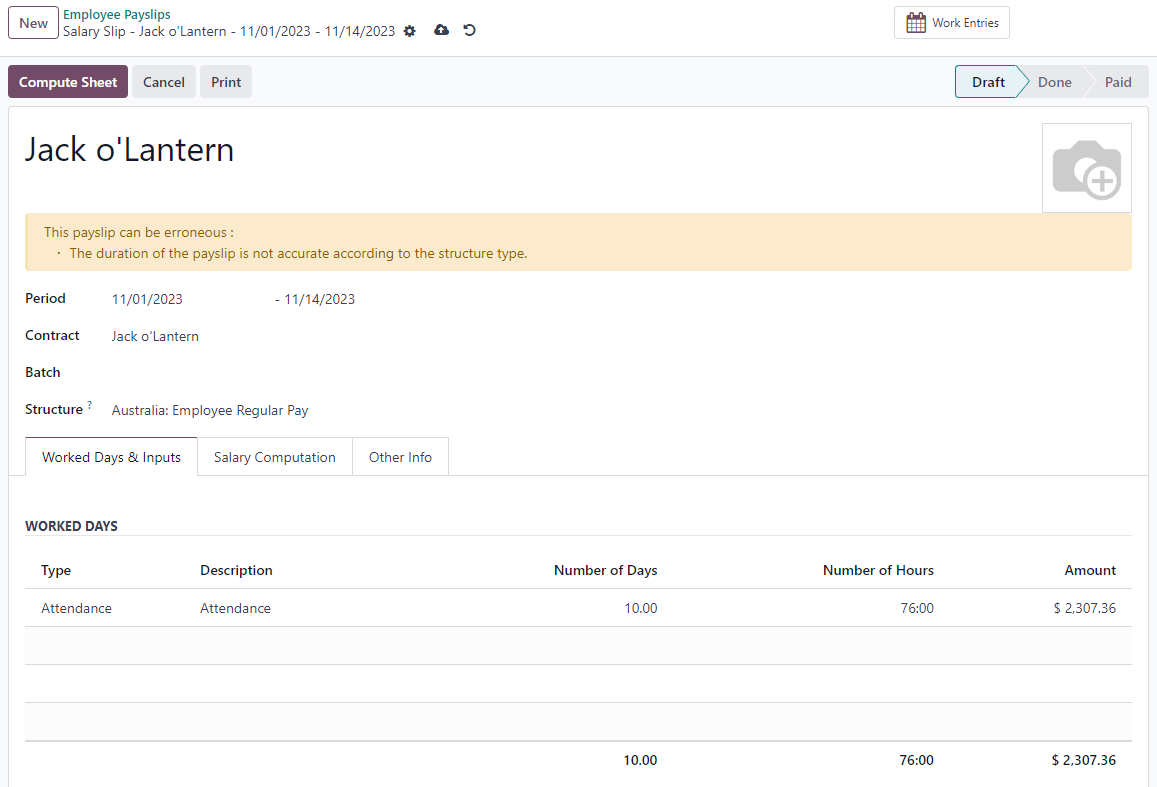
Create an individual payslip
In cases where the pay run does not fall into the category of regular payslips, the option exists to create a pay run dedicated to a single employee. Go to and click New. Employ this method when processing one-time payments for employees, including return-to-work payments (ATO Schedule 4), employment termination payments (ATO Schedule 7 and 11), and commissions and bonuses (ATO Schedule 5). When generating an individual payslip, make sure to proceed with the following steps:
Select an Employee; their Contract will be filled out automatically
Add a pay Period
Select a salary Structure (e.g., return-to-work payment)
Unlike payslips generated from a batch, the payroll user must click the Compute Sheet button to generate payslip lines
Understand payslip features
The same features apply no matter how payslips are created (individually or via batch).
Depending on how work entries are created, the Worked Days & Inputs table automatically shows the number of days and hours the employee worked during the payslip period next to the corresponding total gross amount.
注解
There is one line per work entry type, meaning paid and unpaid time-off, in addition to custom hourly penalty rates (overtime, public holidays, etc.) which are automatically added to the table.

In the Other Inputs section, You can add entries such as allowances and extra pay items in the Other Inputs section.
To incorporate various allowances into an employee’s payslip, create allowances in . Once created, tick the Is an Allowance checkbox for the involved allowances.
重要
Withholding for allowances is not computed automatically. The payroll user has to use the field Withholding for allowance under the other inputs table to manually add the total amount to be withheld across all allowances on that payslip.
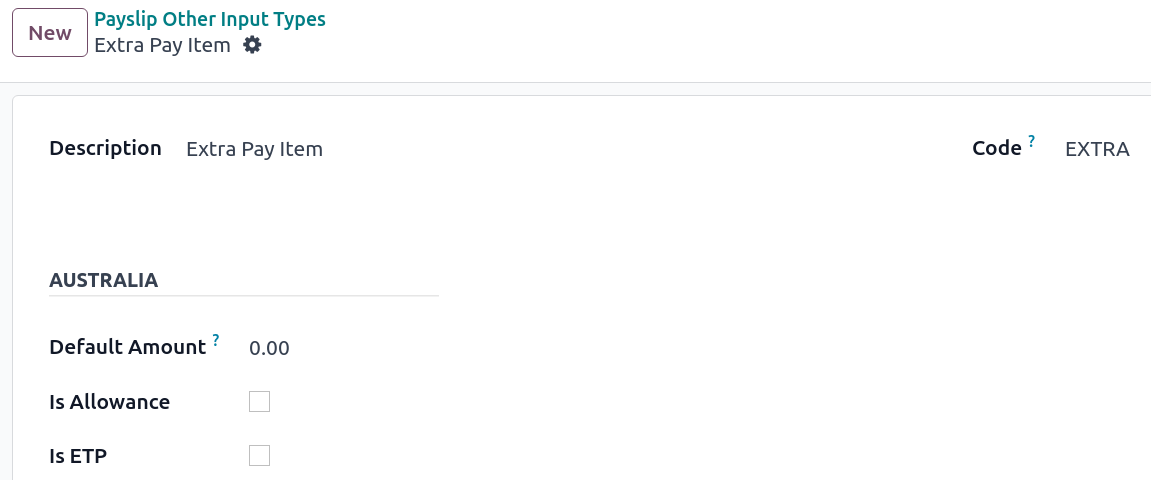
Extra pay items are other inputs added to the payslip’s gross and, as a result, to the withholding amount. An example lies in regular sales commissions, taxed at the same rate as the regular salary (unlike discretionary bonuses, which fall under the ATO’s Schedule 5 and its corresponding salary structure). To configure such a custom pay item, go to and create a new entry with the code EXTRA.
In the Salary Computation tab, the payroll user can verify whether all the pay rules have been computed correctly as per employee, contract and salary structure. Here are a few guidelines to better understand the data.
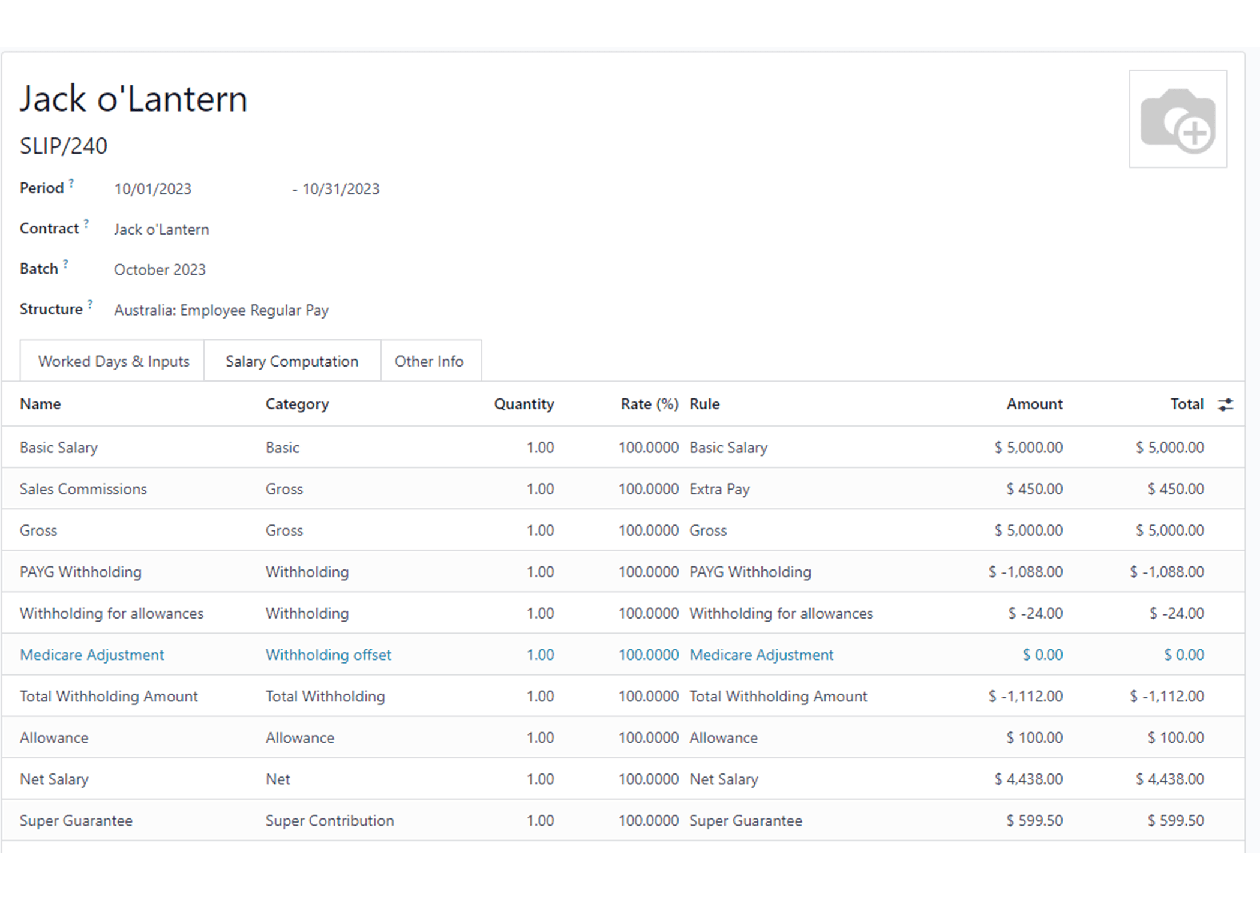
Basic salary: amount from which tax-deductible lines can be subtracted
Gross salary: amount subject to the taxes defined by the salary structure
Withholding: tax amount to be paid to the ATO
Net salary: amount to be paid to the employee’s bank account
Superannuation Guarantee: amount to be provisioned for quarterly payments to the employee’s super account
Allowances & Extra pay items: these lines will show if other inputs are added to the payslip.
Other lines: depending on the employee and contract specifics (Medicare, child support, salary, sacrifice, etc.)
When satisfied with the payslip, click Create Draft entry to generate a draft accounting journal entry that the accountant can review. Note that in the case of a payslip batch, this accounting entry will sum up balances from all payslips.
Pay employees
After a batch or a payslip’s journal entry has been posted, the company can pay their employees. The user can choose between two different payment methods.
Pay the employee in batch via ABA files. This is only possible from the payslip batch level. Ensure the batch’s journal entry has been posted to generate the ABA file. From the batch form view, click Create ABA File and choose the desired bank journal. The newly generated ABA file becomes available for download in the field ABA File. It is possible to re-generate the ABA file after applying corrections to existing payslips.
注解
It is always possible to include an individual payslip into an existing batch in an ABA file.
重要
An ABA file can only be generated if both the company’s bank account and each employee’s bank account have been properly configured.
From the employee’s payslip (), once the payslip’s journal entry has been posted, click Register Payment. The process is the same as paying vendor bills: select the desired bank journal and payment method, then later reconcile the payment with the corresponding bank statement.
One-time payments
Certain payments, such as Return-to-Work payments and Employment Termination Payments (ETP), are processed only once and require a slightly different approach.
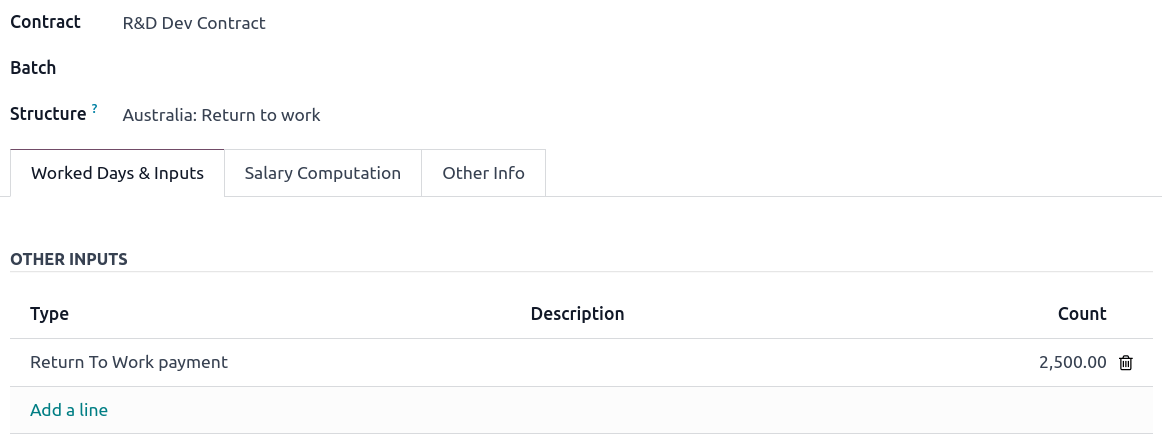
Return-to-Work payments
A Return-to-Work payment is a payment made to an employee to resume working. To process one, create an individual payslip, select the employee, and modify its regular structure to Australia: Return to work. Then, add the gross amount of that payment in the Other Inputs section and compute the payslip. Odoo automatically computes the PAYG withholding, the net amount, and the super guarantee corresponding to that payment.
Termination payments
Before proceeding with the employee’s ETP, make sure that a Contract End Date has been set on that employee’s contract so that Odoo can automatically compute the final prorated salary of that employee for the current month.
First, create the final salary for that employee this month. To do so, create an individual payslip. If the contract end date is set correctly, Odoo will automatically compute the prorated salary up to the final payslip date.
小技巧
We recommend creating a batch on the fly for that payslip, in which the ETP is added as a second payslip of that same batch.
Create a second individual payslip and include it in the same batch. Change the salary structure on that payslip to Australia: Termination Payments. Before computing the sheet, it is important to provide the payslip with termination details .
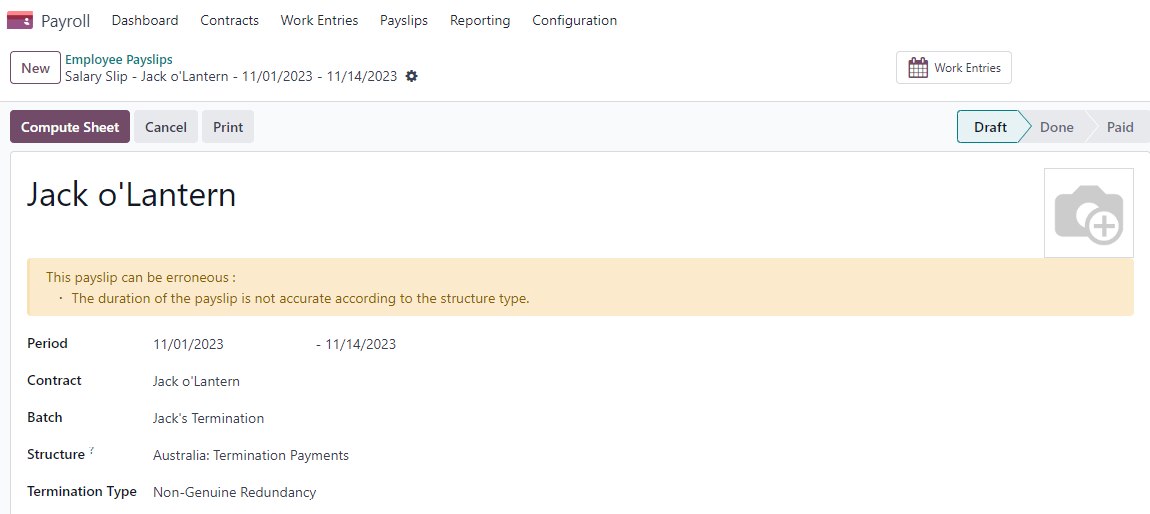
Genuine or Non-Genuine Redundancy. This choice impacts the amounts and caps defined per ETP type.
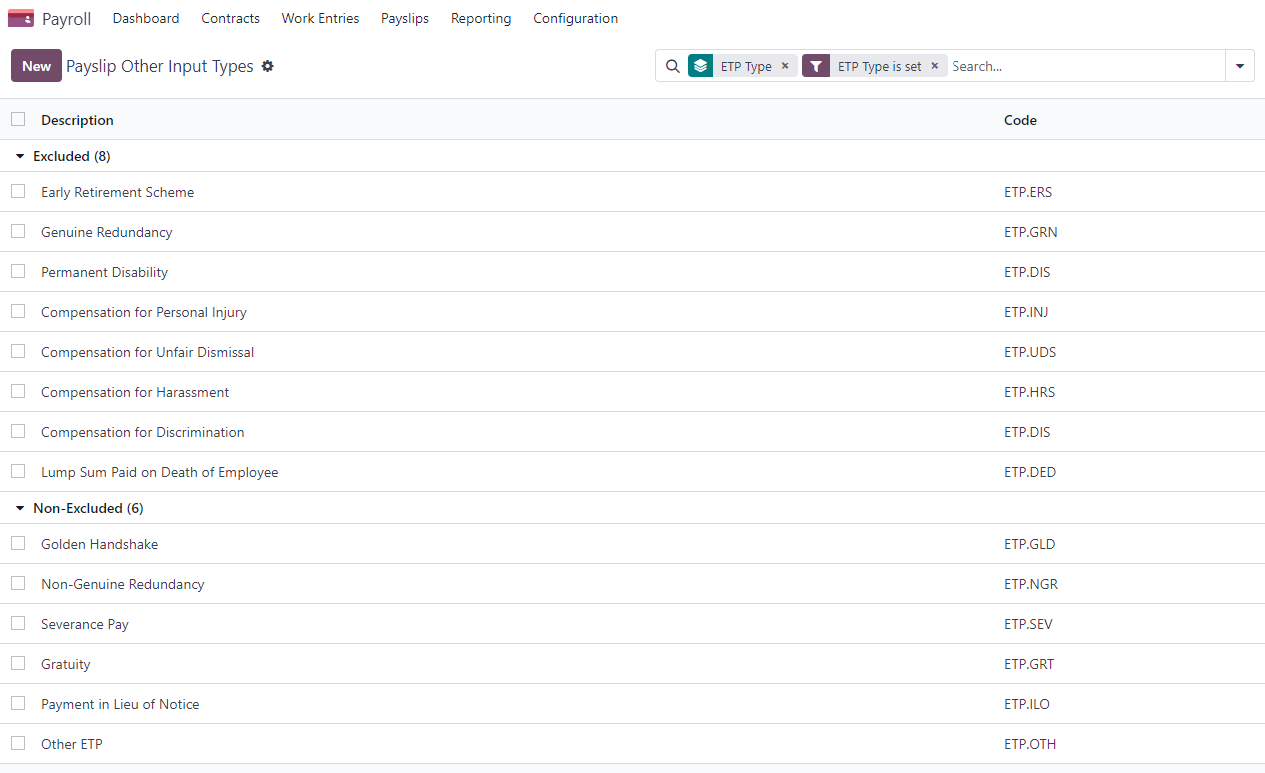
ETP types: see the full list of termination payment types in Other Input Types by filtering by
ETP Type is Set.
Add the relevant ETP type in the Other Inputs table of the payslip, then compute the payslip. Odoo computes the gross ETP, the withholding, the unused leaves, and the net salary according to the rules defined on the ETP, the employee, and their contract. Once payment for both payslips is ready to be processed, an ABA file can be created directly from the batch.
就业英雄 澳大利亚工资单
If your business is already up and running with Employment Hero, you can use our connector as an alternative payroll solution.
The Employment Hero module synchronises payslip accounting entries (e.g., expenses, social charges, liabilities, taxes) automatically from Employment Hero to Odoo. Payroll administration is still done in Employment Hero. We only record the journal entries in Odoo.
重要
KeyPay was rebranded as Employment Hero in March 2023.
配置
Activate the Employment Hero Australian Payroll module (
l10n_au_keypay).Configure the Employment Hero API by going to . More fields become visible after clicking on Enable Employment Hero Integration.

You can find the API Key in the My Account section of the Employment Hero platform.

The Payroll URL is pre-filled with
https://keypay.yourpayroll.com.au.警告
Do not change the pre-filled Payroll URL
You can find the Business ID in the Employment Hero URL. (i.e.,
189241)
您可以选择任何Odoo日记帐来过帐工资单条目。
API 如何工作?
The API syncs the journal entries from Employment Hero to Odoo and leaves them in draft mode. The reference includes the Employment Hero payslip entry ID in brackets for the user to easily retrieve the same record in Employment Hero and Odoo.
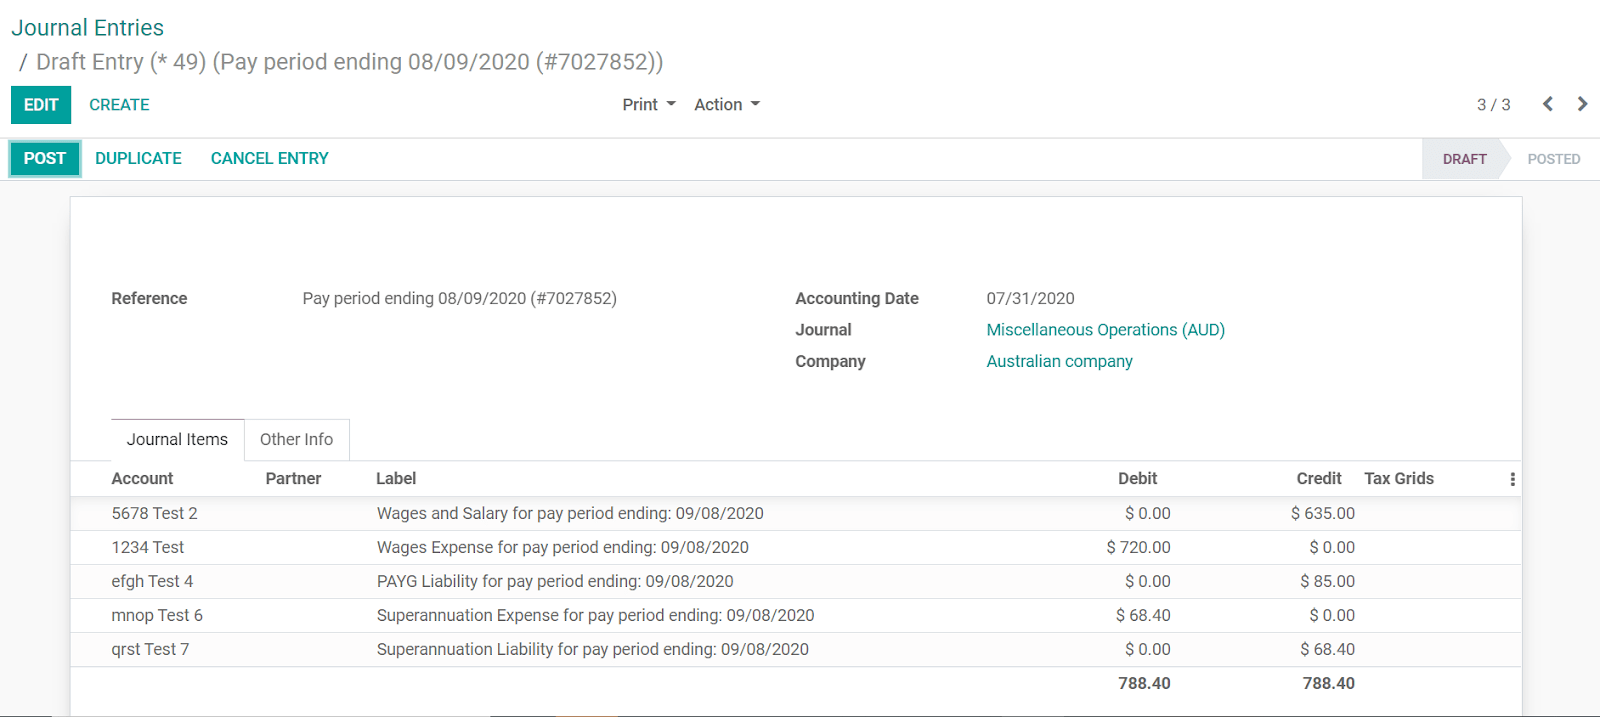
By default, the synchronisation happens once per week. You can fetch the records manually by going to and, in the Enable Employment Hero Integration option, click on Fetch Payruns Manually.
Employment Hero payslip entries also work based on double-entry bookkeeping.
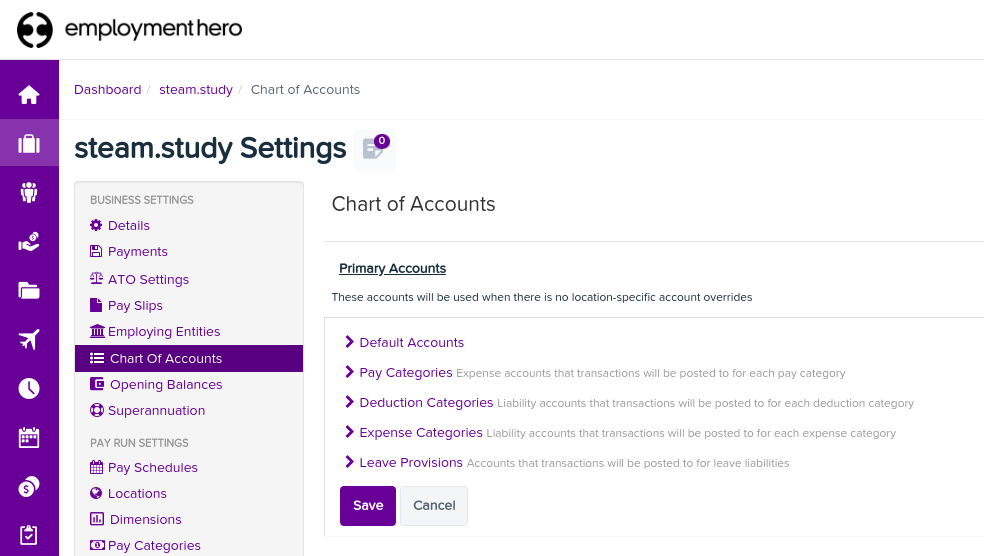
The accounts used by Employment Hero are defined in the section Payroll settings.
For the API to work, you need to create the same accounts as the default accounts of your Employment Hero business (same name and same code) in Odoo. You also need to choose the correct account types in Odoo to generate accurate financial reports.